Understanding bathroom plumbing is essential for every American homeowner, whether you’re planning a renovation in Chicago or troubleshooting a leak in Phoenix. Modern bathroom plumbing systems must comply with the International Plumbing Code (IPC) or regional standards like the Uniform Plumbing Code (UPC) used in California and Western states.
This comprehensive guide explains how bathroom plumbing works, from supply lines and drainage systems to venting requirements and fixture installation. You’ll learn to read plumbing diagrams, understand component functions, and recognize when repairs need professional attention.
Today’s EPA WaterSense certified fixtures can reduce water consumption by 20-30% compared to older models, lowering utility bills while maintaining performance. Whether you’re installing a new bathroom, replacing aging fixtures, or simply want to understand the pipes behind your walls, this guide provides the knowledge you need to make informed decisions and communicate effectively with plumbing professionals.
How Bathroom Plumbing Works
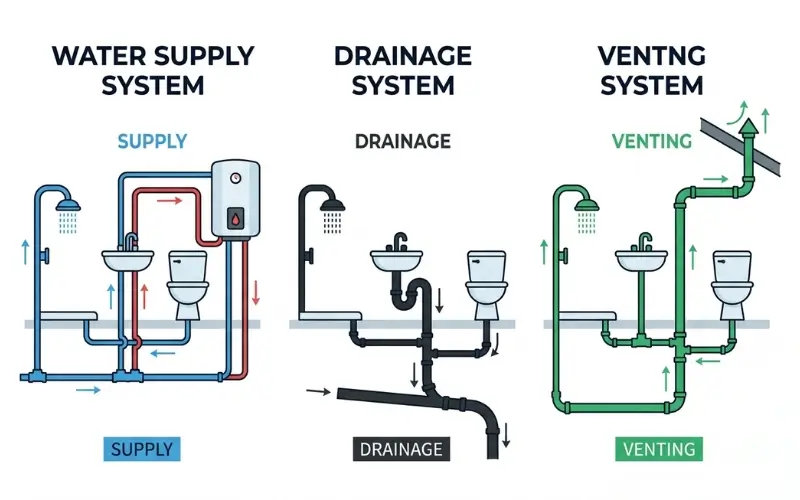
Every bathroom in your home uses a three-part plumbing system that works together to bring clean water in and take dirty water out. Understanding these systems helps you spot problems early and know when to call a professional.
The Water Supply System
Fresh water enters your bathroom through two separate lines. The cold water supply line connects directly to your main water line, while the hot water supply line runs from your water heater. These pipes deliver water to your sink faucet, shower, and toilet at a rate measured in gallons per minute (GPM).
The American Society of Plumbing Engineers (ASPE) sets standards to ensure you get enough water pressure for multiple fixtures running at once. Modern EPA WaterSense faucets use just 1.5 GPM, while older models might use 2.5 GPM or more. Your toilet refills using cold water only, consuming about 1.28 gallons per flush (GPF) if it meets current WaterSense standards.
The Drainage System
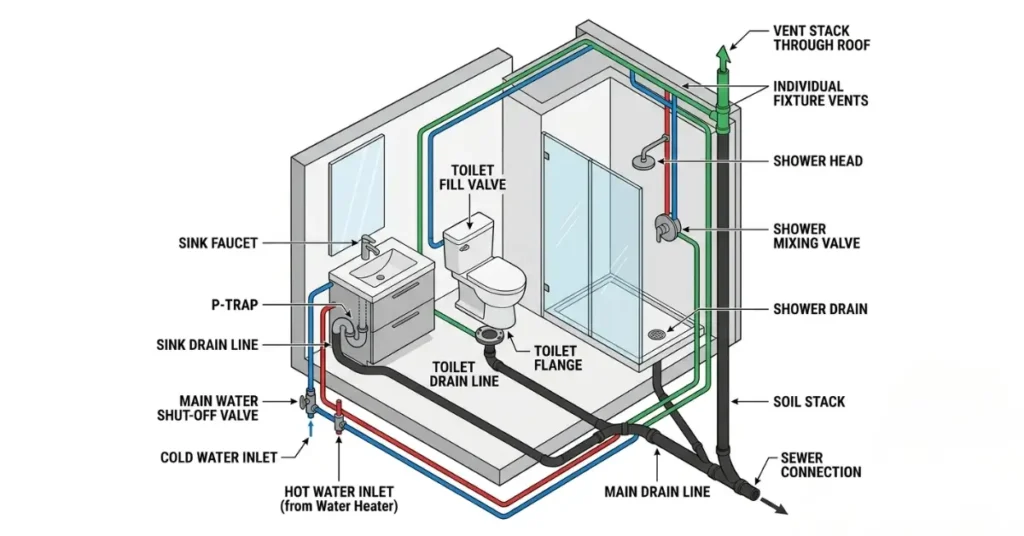
Once you use water, it needs somewhere to go. This is where the drain-waste-vent system, or DWV system, takes over. Every sink, tub, and shower has a curved pipe underneath called a P-trap. This simple U-shaped pipe holds water that blocks sewer gases from coming back up through your drains.
Water flows from the P-trap into larger drain pipes that connect to your main drain line. The International Plumbing Code (IPC) uses something called fixture units to calculate how much drainage each bathroom fixture needs. A bathroom sink counts as one fixture unit, while a toilet counts as three or four units because it drains more water at once.
The Venting System
Here’s what many homeowners don’t realize. Your drains need air to work properly. The vent stack is a pipe that runs from your drainage system up through your roof. It lets air into the pipes so water can flow smoothly without gurgling or backing up.
Think of it like a straw. If you put your finger over the top of a straw and lift it from a glass, the water stays in the straw. Remove your finger and air enters from the top, letting the water drain out. Your plumbing vents work the same way. Without proper venting, drains run slow and traps can lose their water seal, letting sewer gas into your home.
These three systems work together every time you wash your hands, take a shower, or flush the toilet.
Understanding Bathroom Plumbing Diagrams
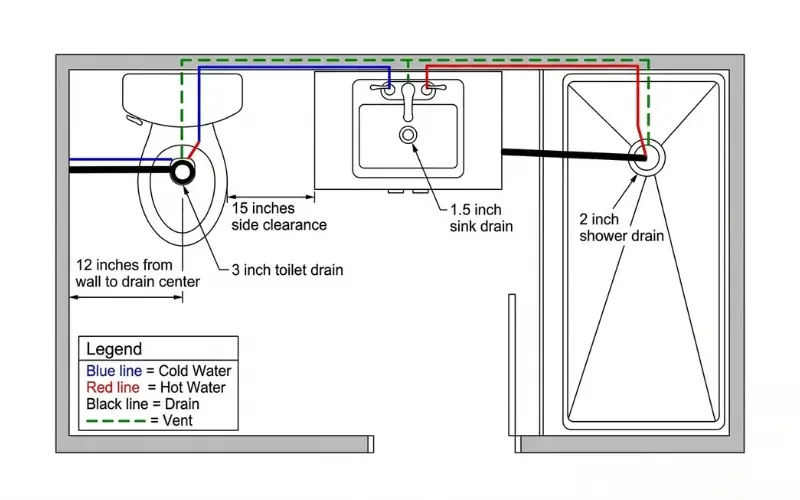
A bathroom plumbing diagram is basically a map of all the pipes in your bathroom. It shows where water comes in, where it goes out, and how everything connects. Before you start any bathroom renovation or repair project, understanding how to read these diagrams can save you time, money, and a lot of headaches.
Common Plumbing Diagram Symbols
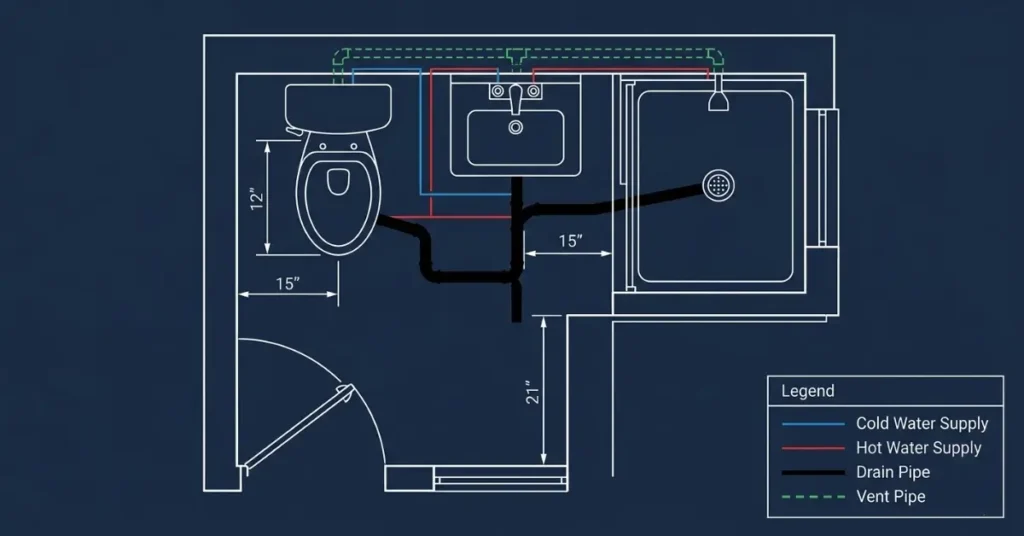
Plumbing diagrams use simple lines and symbols to represent different pipes and connections. Cold water supply lines are usually shown as blue lines, while hot water lines appear in red. Drain pipes are typically drawn as heavier black lines to separate them from supply lines. Vent pipes run vertically on the diagram and connect upward toward the roof.
The International Plumbing Code (IPC) sets standard conventions that most American plumbers and contractors follow when drawing these diagrams. This means a plumbing diagram from a contractor in Houston should look very similar to one drawn by a plumber in Seattle. Learning these basics helps you have smarter conversations with your contractor and understand exactly what work is being done in your home.
Reading Supply and Drain Lines
Every bathroom plumbing diagram shows two completely separate systems running side by side. The supply lines bring fresh water to your fixtures using smaller diameter pipes. Most bathroom fixtures connect to half-inch supply lines, while the main supply running through your walls is typically three-quarter inch.
Drain lines are always larger than supply lines because they move water by gravity instead of pressure. Your bathroom sink connects to a 1.5-inch drain pipe, while your shower or tub uses a 2-inch drain. The toilet needs the largest drain of all at 3 inches. Modern diagrams show these pipes in either PVC, CPVC, or PEX depending on whether they carry supply water or drainage. If you want a deeper understanding of every symbol and pipe size shown on these drawings, our dedicated guide on reading bathroom plumbing diagrams breaks down every element with clear measurements and examples.
Understanding Rough-In Measurements
The most important numbers on any bathroom plumbing diagram are the rough-in measurements. These tell plumbers exactly where to position pipes before walls and floors are finished. The standard toilet rough-in sits 12 inches from the finished wall to the center of the drain pipe.
For a detailed look at complete rough-in measurements and how they apply to full bathroom layouts, our guide to the house plumbing system diagram covers these dimensions with helpful visual references. Getting rough-in measurements right the first time prevents expensive corrections later in your renovation project.
Bathroom Sink Plumbing Components
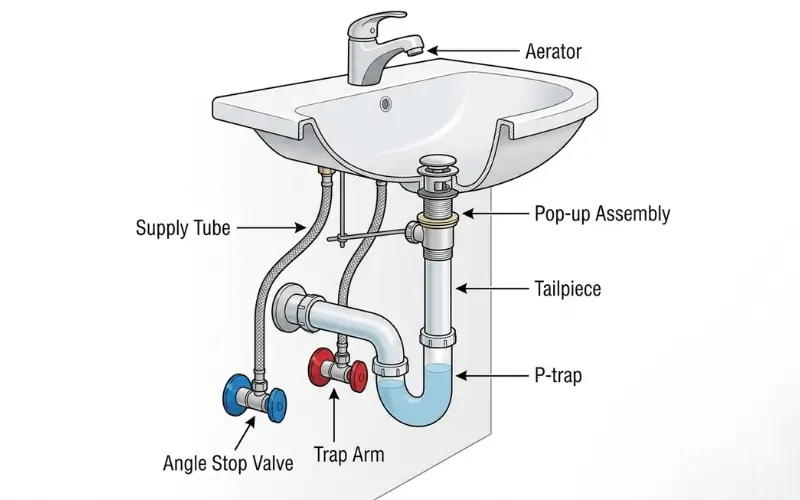
Open the cabinet under your bathroom sink and you’ll see a collection of pipes, valves, and connectors that work together every time you turn on the faucet. These components might look complicated at first, but each one has a simple and specific job to do.
The P-Trap and Drain Assembly
The most important piece under your sink is the P-trap. This curved pipe holds a small amount of water at all times, creating a seal that stops sewer gases from coming up through your drain and into your bathroom. Without a working P-trap, your bathroom would smell like a sewer. The International Plumbing Code (IPC) requires every sink to have one installed.
The P-trap connects above to a tailpiece, which is the straight pipe hanging down from your sink drain. Below the P-trap, a horizontal pipe called the trap arm carries wastewater toward the wall where it connects to your main drain line. Your sink drain needs a minimum 1.5-inch diameter pipe to handle proper water flow according to IPC standards.
The pop-up drain assembly is the stopper mechanism inside your sink basin. When you lift or push the rod behind your faucet, a series of linkages open and close the drain stopper. Hair and soap scum collect around this assembly faster than anywhere else under your sink.
Water Supply Connections
Two small shut-off valves called angle stop valves sit behind or beneath your sink. One controls hot water, the other controls cold. These valves let you shut off water to just the sink without turning off water to your entire home, which makes repairs much easier.
Flexible supply tubes connect these valves to your faucet. Braided stainless steel supply tubes are the most reliable option available, resisting both corrosion and accidental kinking. The faucet aerator at the tip of your spout mixes air into the water stream. EPA WaterSense-labeled faucets use aerators that limit flow to 1.5 GPM, meeting ASME A112.18.1 standards while still providing strong water pressure.
Faucet Types for Bathroom Sinks
Bathroom sink faucets come in centerset and widespread styles. Centerset faucets have a 4-inch spread between handles, fitting most standard sinks. Widespread faucets spread 8 inches apart, giving larger vanities a more open look. Both styles connect to the same supply and drain components underneath.
Shower and Tub Plumbing Systems
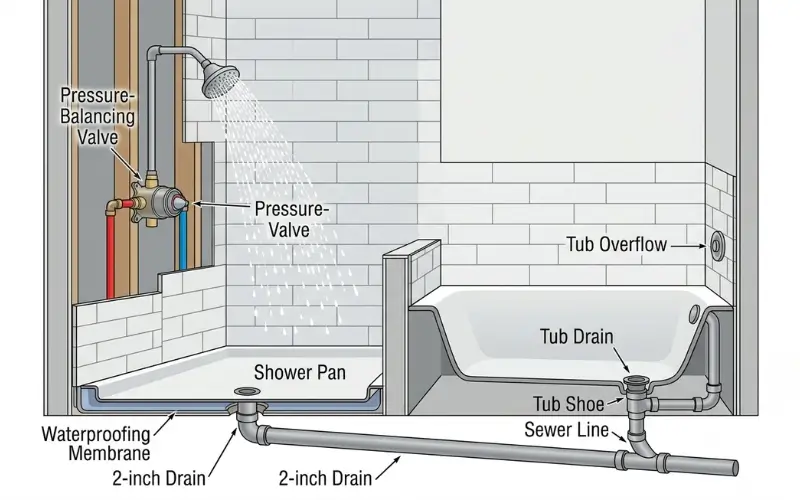
Your shower and bathtub might look simple from the outside, but behind the walls and under the floor sits a network of pipes, valves, and drains working together every time you bathe. Knowing how these systems work helps you understand why certain problems happen and how to fix them before they get expensive.
Shower Valve Types and Safety Features
The shower valve is the most important component in your shower system. It controls both water temperature and flow by mixing hot and cold water together before it reaches your showerhead. Most modern American homes use a pressure-balancing valve, which automatically adjusts when someone flushes a toilet or runs the dishwasher in another room. Without this feature, your shower temperature can suddenly spike dangerously hot.
All pressure-balancing valves sold in the United States must meet ASSE 1016 standards, which require the valve to maintain water temperature within plus or minus 3 degrees Fahrenheit. This protects children and elderly family members from scalding burns. Some homeowners upgrade to thermostatic mixing valves, which give even more precise temperature control and are common in primary bathrooms across cities like New York and Chicago.
Tub and Shower Drain Systems
Water leaving your shower travels down through a 2-inch drain pipe, which is the minimum size required by the International Plumbing Code (IPC) for shower and tub installations. The shower pan sits at the base of your shower and directs all water toward the drain opening. Beneath the shower pan, a waterproofing membrane prevents moisture from reaching the subfloor and causing rot or mold damage.
Your bathtub uses two separate drain components working together. The main tub drain sits at the bottom of the tub, while the tub overflow drain near the top of the tub wall catches water before it spills onto your bathroom floor. Both connect to a tub shoe fitting beneath the floor, which routes wastewater into your main drain line.
Water Efficiency in Showers
Older showerheads used 2.5 gallons per minute (GPM) or more, adding significantly to monthly water bills. EPA WaterSense certified showerheads limit flow to a maximum of 2.0 GPM without reducing the feel of water pressure. Switching to a WaterSense showerhead can save the average American household more than 2,700 gallons of water annually according to EPA data.
Toilet Plumbing Basics
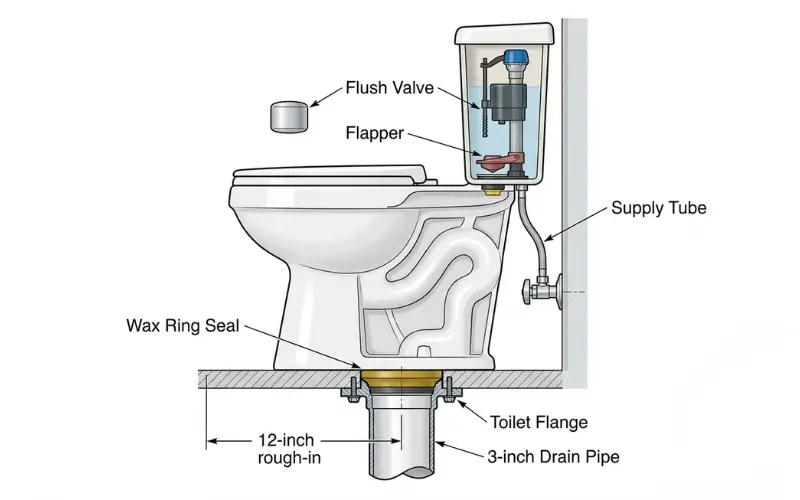
The toilet is the most used plumbing fixture in any American home, and it connects to your plumbing system in a surprisingly straightforward way. Understanding how your toilet works makes it much easier to diagnose problems and decide whether you can fix them yourself or need to call a plumber.
Toilet Rough-In and Installation
Every toilet connects to your floor through a toilet flange, also called a closet flange. This round fitting anchors the toilet to the floor and connects it to the 3-inch drain pipe running beneath. Between the toilet base and the flange sits a wax ring seal, which creates a watertight connection that prevents sewer gases and wastewater from leaking onto your bathroom floor.
Before buying a replacement toilet, you need to know your rough-in measurement. This is the distance from your finished wall to the center of the toilet drain. The standard rough-in in most American homes measures 12 inches. Older homes in cities like Philadelphia and Boston sometimes have 14-inch rough-ins, while compact bathrooms may use a 10-inch rough-in. Buying the wrong size means your new toilet simply will not fit correctly.
Internal Toilet Components
Inside the toilet tank sit several simple parts that work together every time you flush. The flush valve opens when you press the handle, releasing water from the tank into the bowl to clear waste. Once the tank empties, the flapper drops back down and seals the flush valve opening so the tank can refill.
The fill valve then opens automatically and refills the tank with fresh cold water. A float rises with the water level and signals the fill valve to shut off once the tank reaches the correct level. When your toilet runs constantly, it usually means the flapper has worn out and needs replacing, which is one of the easiest and least expensive plumbing repairs a homeowner can do.
If your toilet is clogged rather than running, our guide on how to unclog a toilet covers seven proven methods, with and without a plunger.
Water Efficient Toilet Options
Older toilets manufactured before 1994 used between 3.5 and 7 gallons per flush (GPF), wasting enormous amounts of water. Federal law now requires all new toilets to use a maximum of 1.6 GPF. EPA WaterSense certified toilets go even further, using just 1.28 GPF while still providing a powerful flush. Dual-flush toilets offer two options, typically 0.8 GPF for liquid waste and 1.6 GPF for solid waste, giving homeowners maximum control over water consumption.
Bathroom Plumbing Venting Systems
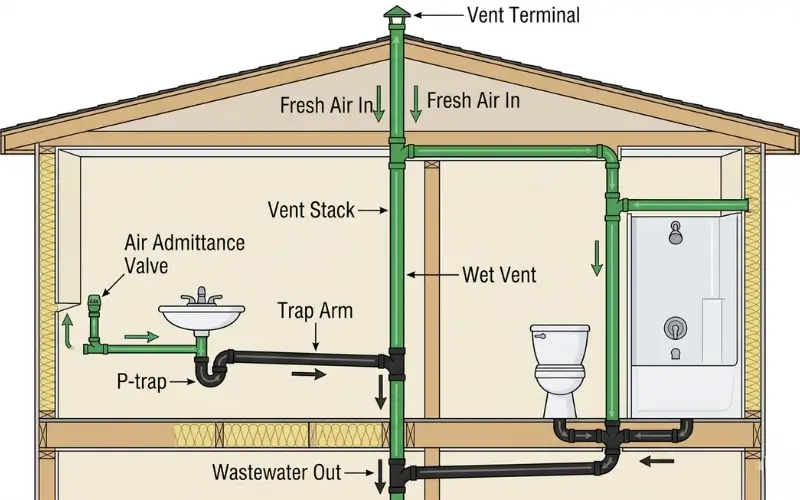
A bathroom plumbing vent pipe is the hidden hero of your home. While you only see the fixtures and drains, the venting system is what keeps everything flowing smoothly and safely. Understanding how venting works helps you diagnose annoying issues like slow drains and bad bathroom odors.
Why Bathroom Venting Matters
Have you ever poured water from a full plastic jug and watched it glug and splash? That happens because air cannot enter the jug fast enough to replace the liquid pouring out. Your bathroom plumbing works exactly the same way. Without a proper plumbing vent, wastewater struggles to drain, creating a powerful vacuum that sucks water right out of your P-traps.
Once that water seal disappears, dangerous sewer gases can easily enter your home. The main vent stack is a vertical pipe that runs from your drains up through your roof to a vent terminal. This pipe constantly lets fresh air into the system so your bathroom drains quietly and quickly.
Wet Venting for Bathroom Groups
Plumbing codes have very specific rules about how these pipes must connect to ensure safety. According to IPC Chapter 9, plumbers can use a specialized technique called wet venting for a standard bathroom group. This clever method allows the bathroom sink drain to double as the vent for your nearby shower and toilet.
Wet venting saves time, materials, and valuable space inside your walls. However, the trap arm, which is the horizontal pipe connecting the sink to the vent, cannot exceed certain lengths. A standard 1.5-inch vent pipe has strict distance limits established by the American Society of Plumbing Engineers (ASPE) to keep the system working properly.
Air Admittance Valves and Alternatives
Sometimes running a traditional vent pipe all the way through the roof is simply impossible during a bathroom remodel. In these difficult cases, plumbers often install an air admittance valve, commonly known as an AAV. This small mechanical valve opens to let air in when water drains, then quickly snaps shut to block sewer gases from escaping into the room.
The Uniform Plumbing Code (UPC), which is widely used in western states like California, has much stricter rules for AAVs than other codes. Because local building departments have different requirements, you must always verify the rules before making changes to any venting bathroom plumbing diagram. If your bathroom lacks proper venting, fixing it should be a top priority.
Basement Bathroom Plumbing Considerations
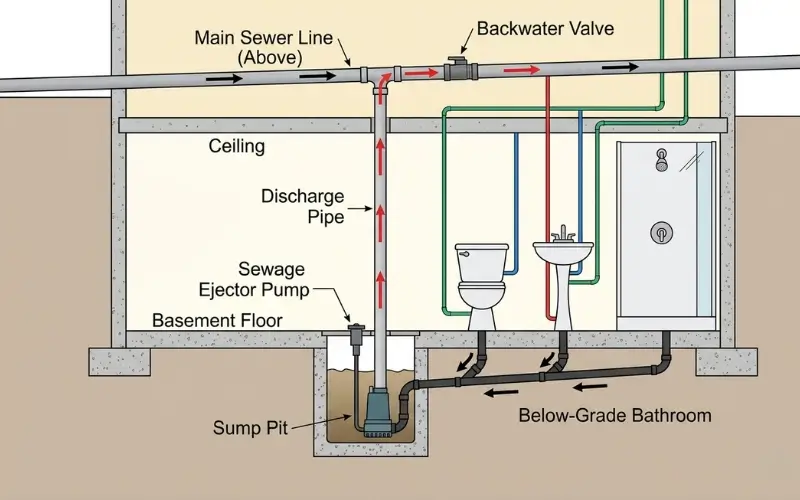
Adding a bathroom in your basement sounds like a great idea, and it truly is. But basement bathroom plumbing works very differently from the bathrooms on your main floor. The biggest challenge is simple gravity. Because this topic covers so much ground, we put together a dedicated basement bathroom plumbing guide that covers ejector pumps, rough-in measurements, permit requirements, and how to avoid breaking concrete.
When You Need a Sewage Ejector Pump
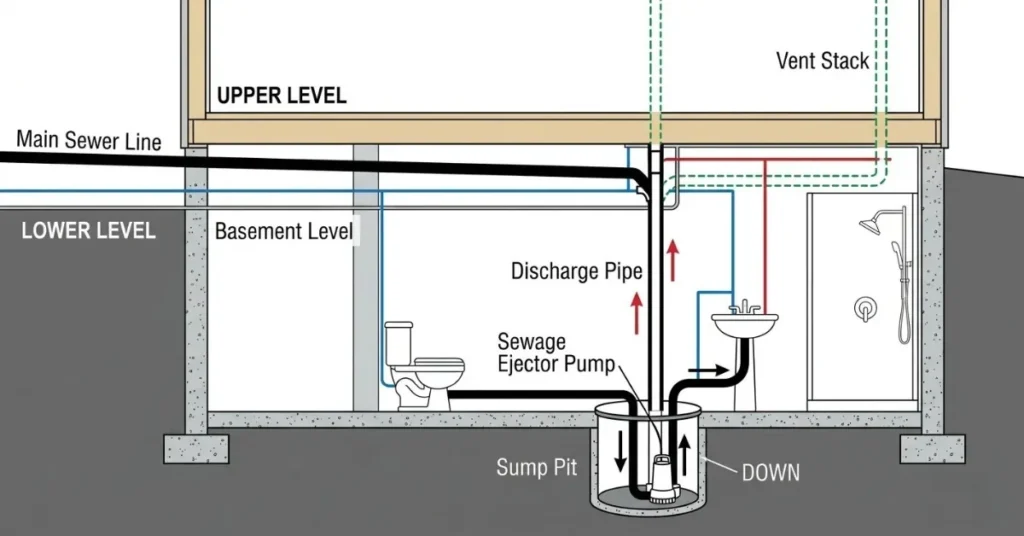
This is where a sewage ejector pump becomes essential. Think of it like a small but powerful pump that collects all the wastewater from your basement bathroom fixtures into a sealed sump pit buried in your basement floor. Once the waste reaches a certain level inside the pit, the pump automatically switches on and pushes everything upward through a pipe that connects to your main drain line above.
The International Plumbing Code (IPC) has specific requirements for ejector pump installations, including proper venting of the sump pit to prevent sewer gases from building up inside your basement. Homeowners in cities like Chicago, Denver, and Philadelphia rely heavily on ejector pumps because basements are extremely common in these colder northern regions of the United States. A quality ejector pump installation typically costs between $600 and $1,800 according to HomeAdvisor data.
Basement Bathroom Code Requirements
Every basement bathroom project requires a permit in nearly every American city and state. Your local building department will inspect the work to make sure it meets current plumbing codes before approving the project. Skipping this step can create serious problems when you try to sell your home later.
Below-grade plumbing installations often require cast iron or schedule 40 PVC pipe for added durability against moisture and pressure. New York has particularly strict requirements for basement plumbing due to the age of its housing stock and the complexity of older sewer systems throughout the city.
Preventing Basement Sewer Backups
Heavy rainstorms can overwhelm municipal sewer systems and push wastewater backward through your pipes. Installing a backwater valve on your main drain line stops this from happening by automatically closing when water tries to flow in the wrong direction. Homeowners in flood-prone areas of Houston and Miami should treat a backwater valve as a necessary investment rather than an optional upgrade for their basement plumbing systems.
Bathroom Plumbing Rough-In Standards
Rough-in plumbing happens before your walls get closed up and your floors get finished. Getting these measurements exactly right the first time prevents expensive mistakes that require tearing out brand new tile or drywall just to move a pipe a few inches. Professional plumbers follow strict standards set by the International Plumbing Code (IPC) to ensure every fixture fits and functions properly.
Toilet Rough-In Measurements
The most critical measurement in any bathroom is the toilet rough-in distance. Measure from your finished wall straight out to the center of the toilet drain pipe in the floor. Most American toilets are designed for a standard 12-inch rough-in measurement. This dimension has been the industry standard for decades.
However, some older homes built before 1950 in cities like Boston and Philadelphia may have a 14-inch rough-in instead. Compact bathrooms and powder rooms sometimes use a 10-inch rough-in to save valuable floor space. Always measure your existing rough-in before buying a replacement toilet, because installing a 12-inch toilet on a 10-inch rough-in simply will not work.
Sink and Vanity Rough-In Standards
Bathroom sink drain pipes typically center 18 to 24 inches above the finished floor, giving you enough room to install the P-trap and supply connections underneath. The hot and cold supply lines usually rough in at 20 to 22 inches high, positioned about 4 inches apart from each other. Wall-mounted sinks need supply lines roughed in at 30 inches above the floor to match standard faucet heights.
Clearance and Spacing Requirements
Building codes do not just tell you where pipes go. They also specify how much empty space must surround each fixture for safe and comfortable use. The IPC requires a minimum of 21 inches of clearance in front of your toilet, measuring from the front edge of the bowl straight forward. The Americans with Disabilities Act (ADA) increases this requirement to 24 inches minimum for accessible bathrooms.
Toilets also need at least 15 inches of clear space measured from the center of the bowl to any side wall or cabinet. California building codes under Title 24 add extra requirements for grab bar blocking that must be installed during the rough-in phase, even if you do not plan to mount the actual grab bars until later.
Bathroom Plumbing Materials and Pipes
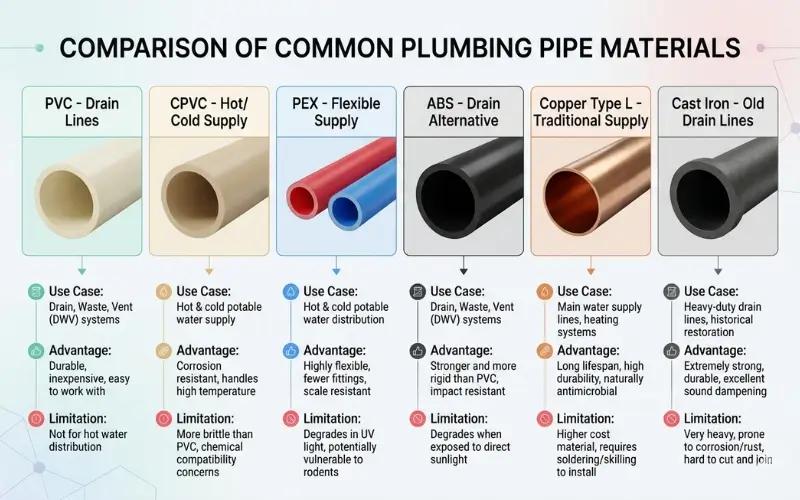
The pipes running through your bathroom walls and floors are not all the same. Different materials serve different purposes, and using the wrong pipe in the wrong place can cause leaks, code violations, and expensive repairs. Understanding which materials work best for each job helps you make smarter decisions during any bathroom renovation or repair project.
Drain Pipe Materials and Sizes
Most modern American homes use PVC, which stands for polyvinyl chloride, for bathroom drain pipes. Schedule 40 PVC is the standard thickness approved by the International Plumbing Code (IPC) for residential drain-waste-vent systems. It is lightweight, affordable, easy to cut, and resists corrosion better than older metal pipes.
Some older homes built before 1970 still have cast iron drain pipes, which are extremely durable but heavy and expensive to repair. ABS, which stands for acrylonitrile butadiene styrene, is another plastic drain pipe option commonly found in western states. IAPMO certifies both PVC and ABS as acceptable drain materials under the Uniform Plumbing Code (UPC). Your bathroom sink needs a 1.5-inch drain pipe, your shower and tub need 2-inch pipes, and your toilet requires a 3-inch drain pipe.
Supply Line Materials and Sizes
Supply lines carry pressurized water to your fixtures, so they need different materials than drain pipes. Copper pipe, specifically Type L copper, has been a top choice for decades because it handles high temperatures and lasts a long time. PEX, which stands for cross-linked polyethylene, is popular in newer homes across Texas, Florida, and Arizona because it is flexible, freeze resistant, and faster to install. CPVC, or chlorinated polyvinyl chloride, also handles both hot and cold water and usually costs less than copper.
Standard bathroom fixtures connect to half-inch supply lines, while the main supply pipe running through your walls is typically three-quarters of an inch.
Quick Comparison: Common Bathroom Pipe Materials
| Material | Common Use in Bathrooms | Key Advantage | Common Caution |
| PVC (Schedule 40) | Drain pipes, DWV | Affordable and corrosion resistant | Not for hot water supply |
| ABS | Drain pipes, DWV | Lightweight and easy to work with | Not allowed everywhere |
| Cast iron | Older drain lines | Very durable and quiet | Heavy and costly to repair |
| Copper (Type L) | Hot and cold supply lines | Long life and heat tolerant | Higher material and labor cost |
| PEX | Hot and cold supply lines | Flexible and freeze resistant | Must be installed per code |
| CPVC | Hot and cold supply lines | Handles heat and costs less than copper | Can become brittle over time |
Choosing the Right Materials
Never use standard PVC pipe for hot water supply lines. Regular PVC cannot handle the heat and can warp or fail. Always use CPVC or PEX for hot water supply. NSF/ANSI certified pipes and fittings help ensure materials meet safety standards for drinking water.
Common Bathroom Plumbing Problems
Every bathroom develops plumbing problems over time, no matter how well it was built. Knowing the most common issues helps you catch them early before small problems turn into expensive repairs.
Hair clogs are the number one drain problem in American bathrooms. Hair collects inside the P-trap and trap arm, slowing drainage until water backs up completely. Homeowners in hard water regions like Phoenix and Las Vegas deal with an additional problem called limescale, which is a crusty mineral buildup that blocks faucet aerators and showerheads over time.
Running toilets are another extremely common issue. A worn-out flapper inside the tank allows water to constantly leak from the tank into the bowl, forcing the fill valve to run continuously. According to the EPA, a running toilet can waste up to 200 gallons of water every single day.
For a deeper look at these and other issues throughout your home, our guide on the most common plumbing problems covers everything in detail.
Bathroom Plumbing Costs and Installation
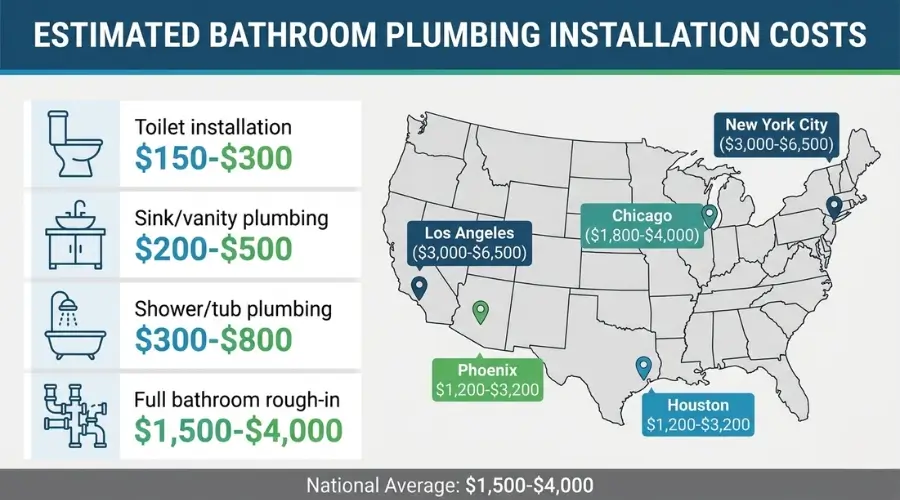
Bathroom plumbing costs vary widely depending on where you live, what work needs doing, and whether you need permits. Understanding typical price ranges helps you budget realistically and avoid getting overcharged.
According to HomeAdvisor, a full bathroom plumbing installation costs between $1,500 and $4,000 nationally. Homeowners in New York City and Los Angeles typically pay significantly more, averaging $3,000 to $6,500 due to higher labor rates and stricter code requirements. Houston and Phoenix homeowners generally pay closer to the national average, with most projects falling between $1,200 and $3,200.
Bureau of Labor Statistics data shows licensed plumbers earn between $28 and $58 per hour depending on location and experience level. Most bathroom plumbing projects also require permits, which range from $50 in states like Texas to over $500 in California. Always hire a contractor affiliated with the Plumbing-Heating-Cooling Contractors Association (PHCC) to ensure quality workmanship and proper licensing.
Frequently Asked Questions
What is a P-trap and why does every sink need one?
A P-trap is the curved pipe beneath your sink that holds a small amount of water at all times. This water creates a seal that blocks sewer gases from entering your home. The International Plumbing Code (IPC) requires a P-trap on every sink drain without exception.
How much water does a WaterSense toilet save?
EPA WaterSense toilets use just 1.28 gallons per flush compared to older models using 3.5 to 7 gallons. The EPA estimates WaterSense toilets save the average American family nearly 13,000 gallons of water annually.
What is the difference between IPC and UPC plumbing codes?
The International Plumbing Code (IPC) is used in most eastern and central states, while the Uniform Plumbing Code (UPC) is adopted primarily in western states like California, Oregon, and Washington. Both codes cover the same topics but differ on specific technical requirements.
Can I use regular PVC pipe for hot water supply lines?
No. Standard PVC cannot handle hot water temperatures and will warp or fail quickly. Always use CPVC or PEX for any hot water supply lines in your bathroom.
What size drain pipe does a bathroom sink need?
The IPC requires a minimum 1.5-inch diameter drain pipe for bathroom sinks. Showers and tubs need 2-inch drains, and toilets require 3-inch drain pipes.
Do I need a permit for bathroom plumbing work?
Yes, in almost every American city and state. Permit fees range from $50 in Texas to over $500 in California. Always pull the required permits before starting any bathroom plumbing project.
Conclusion
Understanding bathroom plumbing systems helps you maintain fixtures properly, prevent expensive problems, and communicate clearly with contractors. Whether you follow International Plumbing Code standards or upgrade to EPA WaterSense certified fixtures, this knowledge saves money and protects your home. For comprehensive information about how plumbing systems work throughout your entire house, explore our complete guide to plumbing systems explained. When projects exceed your comfort level, always hire licensed professionals for safe, code-compliant installations.