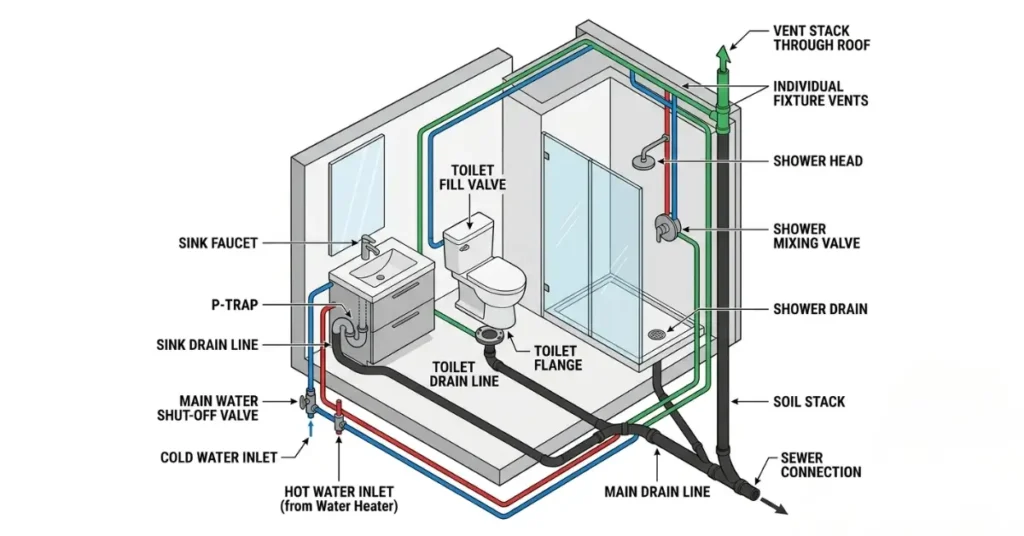
Understanding bathroom sink plumbing saves you money and helps you avoid costly mistakes. Whether you are replacing worn parts or installing a brand new sink, knowing how the system works puts you in control. Bathroom sink plumbing connects three separate systems inside your walls and cabinets. These are the water supply system, the drain system, and the vent system. Getting any one of these wrong causes leaks, slow drains, or sewer gas problems inside your home.
Bathroom Sink Plumbing Diagrams
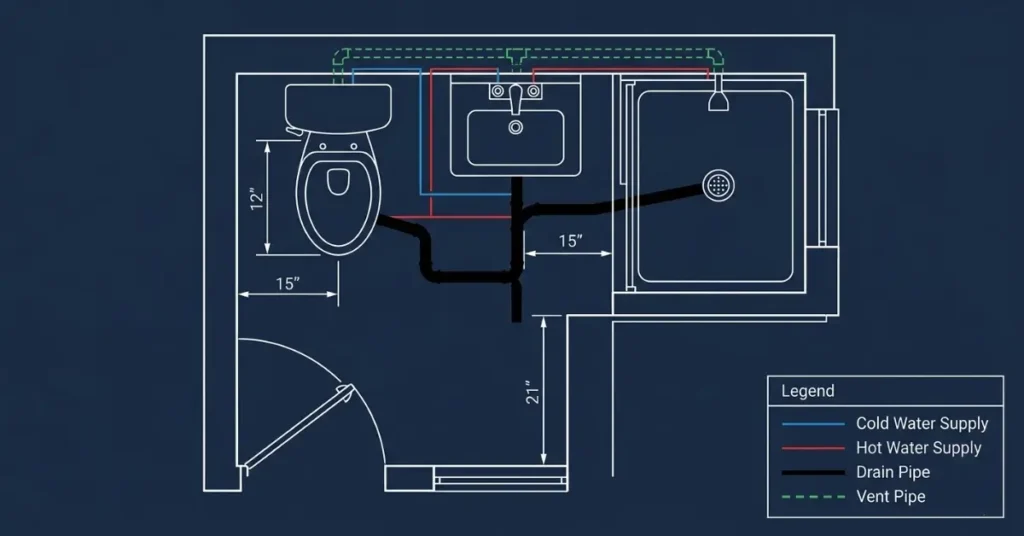
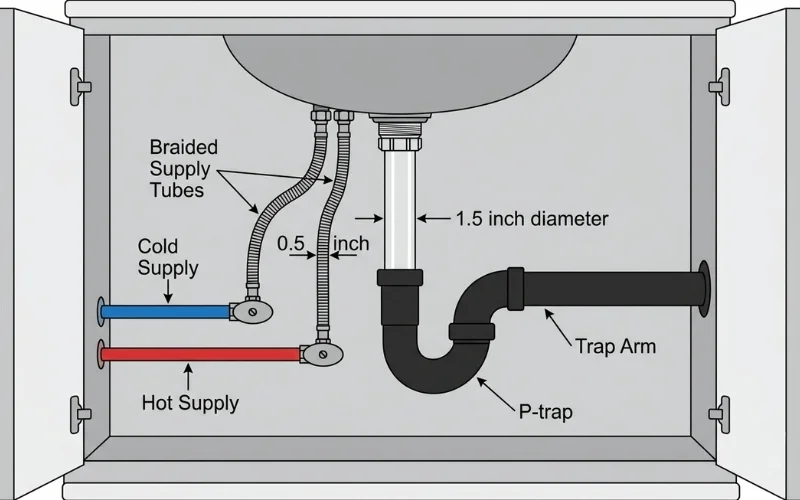
A bathroom sink plumbing diagram shows the complete system from a side view. It uses color-coded lines to represent different pipe types. Blue lines show cold water supply pipes running to your faucet. Red lines show hot water supply pipes coming from your water heater. Thick black lines show the drain pipes carrying wastewater away from the basin.
Reading a Bathroom Sink Plumbing Layout
Every professional bathroom sink plumbing layout follows standards set by the International Plumbing Code (IPC). The diagram clearly shows the 1.5-inch drain pipe dropping from the sink basin, connecting to the P-trap below, and routing through the trap arm into the wall. Hot and cold half-inch supply lines run parallel to each other, connecting to angle stop valves near the wall before reaching the faucet above.
A bathroom sink plumbing diagram with measurements adds dimension lines showing exact pipe heights and spacing. These numbers help plumbers position pipes correctly during rough-in before walls are closed. If you want to understand every symbol and pipe size shown on professional plumbing drawings, our complete guide to reading bathroom plumbing diagrams breaks down every element with clear examples and standard measurements used across the United States.
Plumbing Under a Bathroom Sink
Open the cabinet under your bathroom sink and you will see several pipes and valves working together. This area contains the most important parts of your bathroom sink drain system. Most homeowners only look under here when something goes wrong. Understanding what you are looking at makes troubleshooting much easier.
What You Will Find Under Your Sink
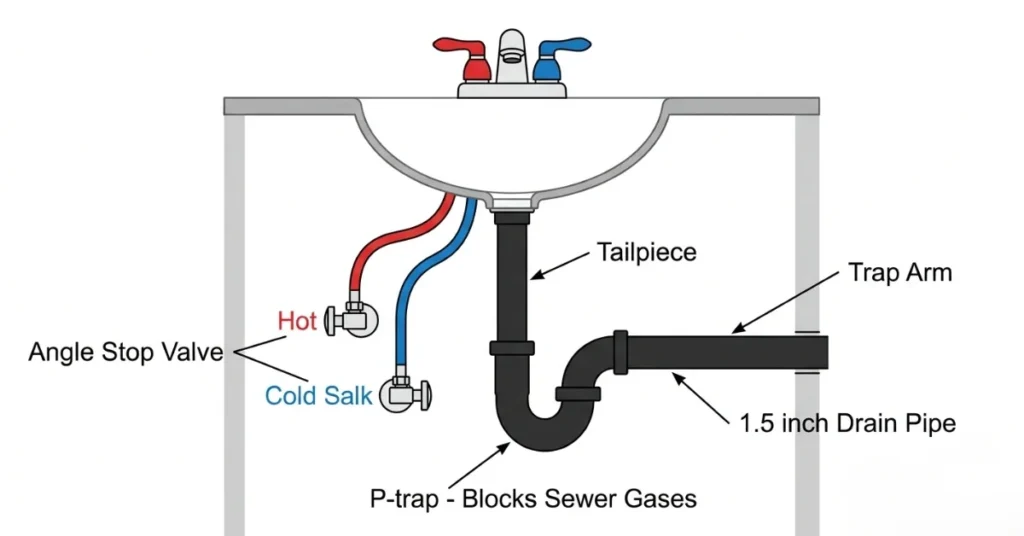
The first thing you notice is the P-trap. This curved pipe sits directly below the drain opening of your sink basin. It holds a small amount of water at all times. This water creates a seal that stops dangerous sewer gases from rising up through your drain and entering your bathroom. The International Plumbing Code (IPC) requires a properly functioning P-trap on every bathroom sink without exception.
Above the P-trap sits the tailpiece. This is the straight vertical pipe connecting the sink drain opening to the top of the P-trap. Below the P-trap, a horizontal pipe called the trap arm carries wastewater toward the wall where it enters the drain system behind your wall.
Bathroom Sink Plumbing Connections Explained
Two small valves called angle stop valves sit on the supply pipes coming out of your wall. One controls hot water and the other controls cold. These valves let you shut off water to just the sink without turning off water to your whole house. Flexible braided stainless steel supply tubes connect these valves to the faucet above. These tubes are far more durable than older chrome or plastic versions and resist both corrosion and accidental kinking over time.
Bathroom Sink Drain Plumbing Parts

Every component under your bathroom sink has a specific name and function. Knowing these parts helps you buy the right replacements and describe problems clearly when calling a plumber.
Complete Bathroom Sink Plumbing Parts List
The tailpiece is the first section of pipe below your drain. It connects the drain basket at the bottom of the sink basin to the top of the P-trap. Tailpieces are typically 1.25 inches in diameter and come in chrome, PVC, or ABS materials.
The P-trap is the U-shaped curved pipe that holds the water seal. Most modern P-traps use white PVC or chrome metal. Polyvinyl chloride, commonly called PVC, is the most popular choice because it is lightweight, affordable, and resistant to corrosion. ABS, which stands for acrylonitrile butadiene styrene, is another approved drain material common in western states under the Uniform Plumbing Code (UPC).
The pop-up drain assembly is the stopper mechanism inside your sink basin. When you lift or press the rod behind your faucet, a series of linkages raise and lower the drain stopper. Hair and soap scum collect around this assembly very quickly.
Bathroom Sink Drain Pipe Sizes and Materials
The IPC requires a minimum 1.5-inch diameter drain pipe for every bathroom sink. This size handles normal water flow without backing up or causing slow drainage problems. The trap arm connecting the P-trap to the wall drain must also be at least 1.5 inches in diameter.
Faucets meeting ASME A112.18.1 standards include a built-in aerator at the tip of the spout. This small screen mixes air into the water stream, reducing splash and controlling flow rate. EPA WaterSense certified faucets restrict flow to just 1.5 gallons per minute while still delivering strong and satisfying water pressure at the tap.
Installing Bathroom Sink Drain Plumbing
Installing bathroom sink drain plumbing is a manageable project for most American homeowners with basic tools. The key is working in the correct sequence so every connection seats properly without leaks.
How to Plumb a Bathroom Sink Step by Step
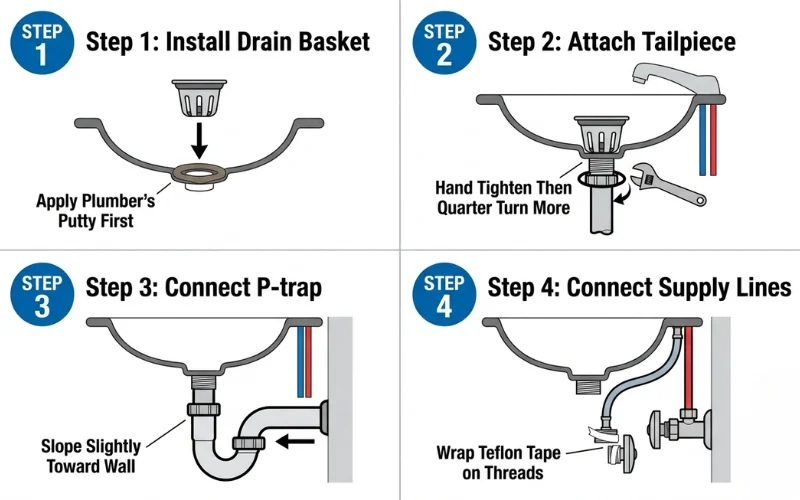
Start with the drain assembly before installing the faucet. Apply plumber’s putty around the underside of the drain flange before pushing it through the drain hole from above. Press it firmly into place and tighten the locknut from below until the putty squeezes out evenly around the flange edge. Wipe away the excess putty cleanly.
Thread the tailpiece onto the drain body below the sink. Hand tighten first, then use slip-joint pliers to snug it up without overtightening. Connect the P-trap to the bottom of the tailpiece using the slip-joint connection included with most bathroom sink plumbing kits. Route the trap arm into the wall drain opening, checking that it slopes slightly downward toward the wall.
How to Install Bathroom Sink Plumbing Supply Lines
Turn off the angle stop valves before connecting supply lines. Wrap Teflon tape, also called PTFE tape, clockwise around all threaded fittings before tightening. Connect braided stainless steel supply tubes from the angle stop valves up to the faucet inlet ports above. Hand tighten first, then use a wrench to give each connection a quarter turn more.
Following installation, turn the angle stop valves on slowly and check every connection carefully for drips. The American Society of Plumbing Engineers (ASPE) recommends running water for several minutes and checking connections multiple times before closing the cabinet. A bathroom sink plumbing kit that includes a P-trap, tailpiece, and supply tubes makes the whole process faster and ensures all parts fit together properly.
Bathroom Sink Plumbing Rough In
Bathroom sink plumbing rough in refers to the stage where supply and drain pipes are positioned inside walls and floors before any finishing work begins. Getting these measurements right prevents expensive corrections after tile and drywall are already installed.
Standard Rough-In Heights for Bathroom Sinks
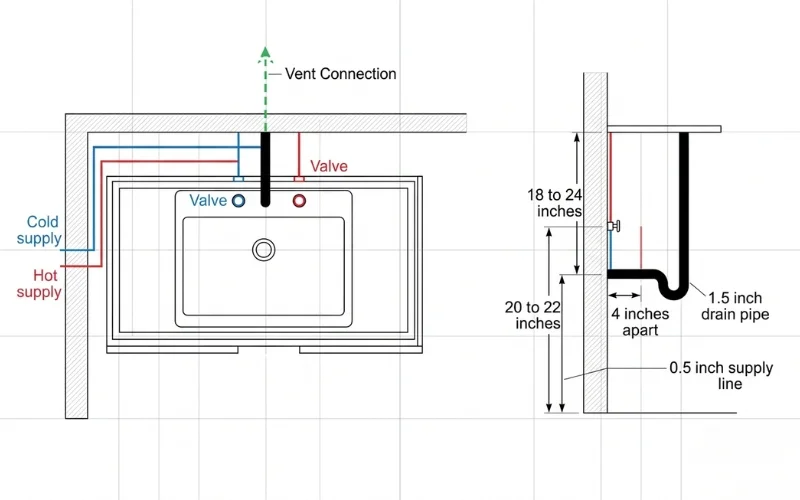
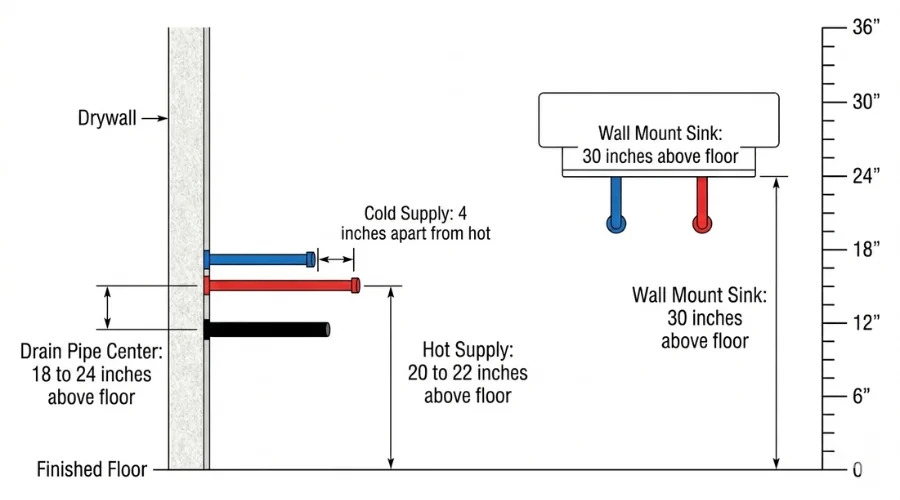
Industry standards established by ASPE recommend centering the drain pipe between 18 and 24 inches above the finished floor. This height leaves enough room below for the P-trap and supply connections to fit comfortably inside the cabinet space.
Hot and cold supply lines rough in at 20 to 22 inches above the finished floor. They should be positioned about 4 inches apart from each other. This spacing matches the inlet spacing on most standard faucets sold in American home improvement stores.
Wall-mounted sinks need supply lines roughed in higher, at approximately 30 inches above the finished floor, to match the taller faucet connection points on pedestal and wall-hung sink models. The IPC does not specify exact sink drain heights but requires all connections to maintain proper slope and trap requirements throughout the installation. Connecting these rough-in pipes to your basement bathroom plumbing system requires extra planning if your main drain runs below floor level.
Replacing Bathroom Sink Plumbing
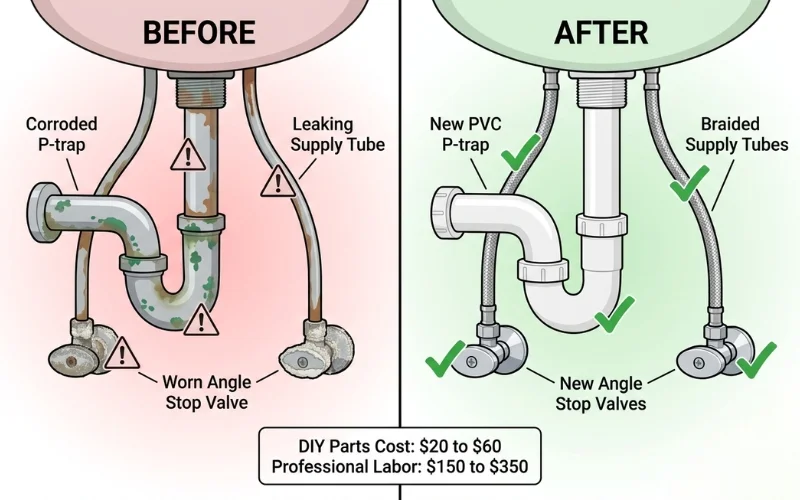
Bathroom sink plumbing replacement becomes necessary when pipes corrode, joints start leaking, or water pressure drops significantly at the faucet. Most replacement jobs are straightforward DIY projects that take less than two hours.
Signs You Need to Replace Sink Plumbing
Look for white mineral deposits on chrome pipes, which signal hard water buildup inside the lines. Green or brown staining around joints means slow corrosion is happening at the connection point. A P-trap that drips even after tightening needs replacing immediately because it will not seal properly once the plastic threads are worn.
DIY vs Hiring a Plumber
Supply tubes and P-traps are the easiest parts to replace yourself. Both cost between $10 and $30 at any hardware store. According to HomeAdvisor, hiring a licensed plumber for a complete bathroom sink plumbing replacement costs between $150 and $350 nationally. Bureau of Labor Statistics data shows licensed plumbers earn between $28 and $58 per hour depending on location and experience level.
Homeowners in Chicago typically pay closer to the higher end of that range. Houston homeowners generally pay less for the same work. Always get two or three quotes before hiring. Look for contractors affiliated with the Plumbing-Heating-Cooling Contractors Association (PHCC) to ensure proper licensing and quality workmanship. Our complete bathroom plumbing guide explains when repairs are simple enough for DIY and when professional help is the smarter choice.
Bathroom Sink Plumbing Codes
Every bathroom sink plumbing installation must follow local building codes. These rules protect your health and safety by ensuring drain systems work correctly and do not allow sewer gases into your living space.
IPC Requirements for Bathroom Sinks
The International Plumbing Code (IPC) sets clear rules for bathroom sink installations across most of the United States. Every sink must have a properly installed P-trap within a specific distance of the drain. The minimum drain pipe size is 1.5 inches throughout the entire drain run from the sink to the main stack.
Permit Requirements by State
California follows the Uniform Plumbing Code (UPC), published by IAPMO, which has slightly different technical requirements than the IPC. California enforces some of the strictest plumbing codes in the country and requires permits for most sink plumbing work beyond simple fixture replacements. Texas permit fees are generally lower but vary significantly by city and municipality. New York requires strict inspections for all plumbing work in both new construction and renovation projects throughout the state.
Frequently Asked Questions
What parts are needed for bathroom sink plumbing?
A complete bathroom sink plumbing setup needs a drain basket, tailpiece, P-trap, trap arm, two angle stop valves, and two braided supply tubes. Most hardware stores sell bathroom sink plumbing kits containing all these parts together at a lower combined price.
What size drain pipe does a bathroom sink need?
The IPC requires a minimum 1.5-inch diameter drain pipe for all bathroom sinks. This size handles normal household water flow without backing up. The P-trap and trap arm must also be 1.5 inches in diameter throughout.
How much does it cost to replace bathroom sink plumbing?
According to HomeAdvisor, a complete bathroom sink plumbing replacement costs between $150 and $350 for professional labor. Basic parts like a new P-trap and supply tubes cost $20 to $60 at most hardware stores for confident DIYers.
Can I replace bathroom sink plumbing myself?
Yes for basic parts like the P-trap and supply tubes. These require no special tools and take less than one hour. Complex jobs involving wall pipes, drain line repairs, or new rough-in work should always be handled by a licensed plumber.
Do I need a permit for bathroom sink plumbing?
Simple fixture replacements rarely need permits in most states. Any work involving moving drain pipes or adding new supply lines typically requires a permit. Fees range from $50 in Texas to over $300 in California depending on project scope.
Conclusion
Bathroom sink plumbing is one of the most manageable systems in your entire home once you understand how the parts connect. From the P-trap and tailpiece to supply tubes and angle stop valves, every component has a clear job. Following International Plumbing Code standards and upgrading to EPA WaterSense certified faucets keeps your sink efficient and code-compliant. For a complete look at how sink plumbing connects to your full bathroom system, explore our detailed bathroom plumbing guide. When projects feel too complex, always hire a licensed professional.